
For the first year after I started working with Star Trail photography, I’ve used StarStax to blend my individual frames together into the trail photo. Unfortunately, StarStax has some limitations, and I have suspected that the resulting star trail image wasn’t as high of quality as the input images. So I started researching other options, including stacking manually in Photoshop. The root of the idea is to set each of your layers above the bottom layer to blending mode = ‘lighten’ – so the bright starts shine through on each subsequent layer. The problem is, when you have 200+ layers, that can take a long time to go through each photo and update the blending mode on each. Knowing that there were plenty of smart photographers out there and that Photoshop had multiple ways to extend and enhance with actions, panels, scripts, and the like, I knew there had to be automated ways to do this. The real question became, how much work would it take to reduce the amount of work.
I found several panels and the like that worked in CS5 or CS6, but not the latest Photoshop CC which I am a subscriber to. But fear not! Photoshop made it amazingly simple to set all those annoying layers to the same blend mode without needing a script, an action, or anything. It’s right there in Photoshop CC for the finding. If you know where to look.
First, load all your base images into Photoshop into a single stack (File -> Script >- Load Images into Stack from Photoshop, load from Bridge, or Lightroom, etc).
Original Method:
Second, scroll to the bottom of your stack and select the second to the bottom layer – the first layer you want to set to Lighten, and set the blend mode.

Set Layer Blend Mode = ‘Lighten’
Next, Right-Click on your newly set ‘Lighten’ layer, a context menu will open up and scroll up and find ‘Copy Layer Style’

Copy Layer Style
Select all the remaining Layers above your current lighten layer – all those annoying 200+ layers you want to quickly blend together.
Now for the magic, right click again on your selected layers and find that menu item that says ‘Paste Layer Style’ – try not to fall out of your chair at this point.

Paste Layer Style
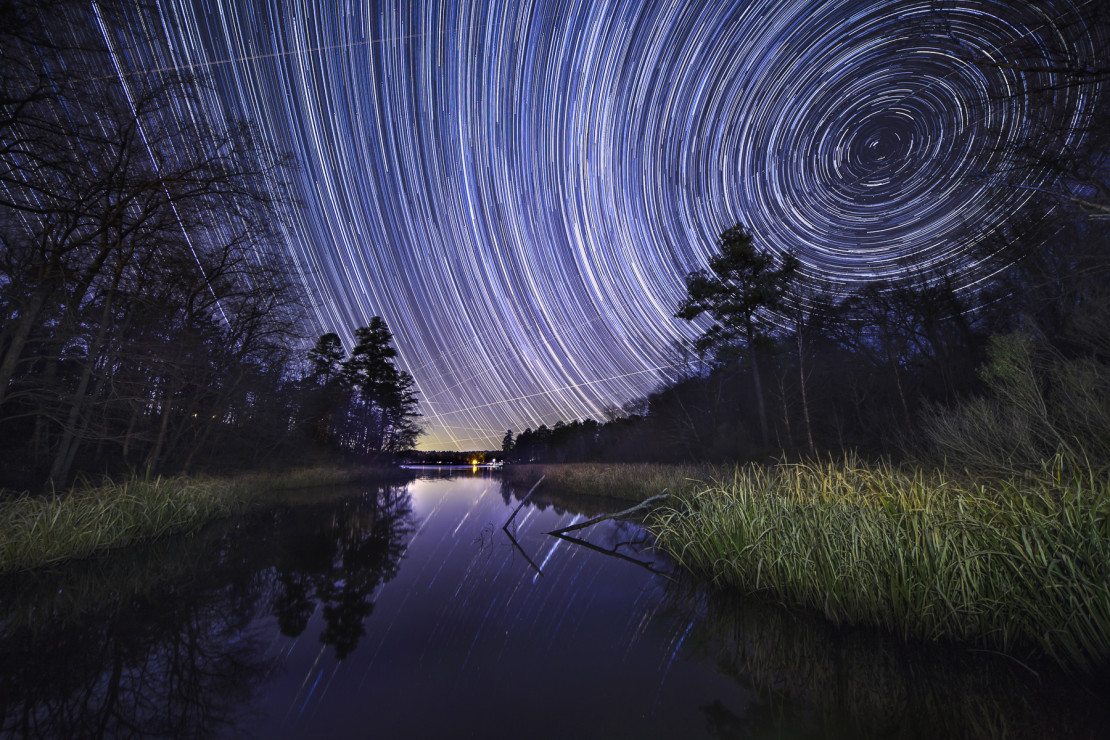
I just ran a stack of 200+ layers, results were near instantaneous. The star trail appeared within a blink of an eye (example below was done with around 70 frames)

FASTER Method! – added April 2020
Time for a small update to my most popular article as I’ve recently discovered an even easier way to achieve the same results! I’m not entirely sure if this is a new feature to the latest 2019/2020 versions of Photoshop CC or not as I no longer have older versions on my computer, so I have not removed the original version above. But certainly try this too!
First, just select all your layers, yup, all of the layers you want to stack, select them all in the layer panel. Got them all selected? Good. Now just change blend mode to Lighten. That’s it. That’s seriously the entire process.

Just select all, and change blend mode from ‘Normal’ to ‘Lighten’
Again, I can’t promise how old of a version of Photoshop this works on, if you have an older version of Photoshop CC or v6 still in use, give this a go and let me know what you discover.
Next Steps
Star trail images are rarely as simple as selecting all the images and hitting ‘go’ on Lighten mode. Aircraft trails, foreground lighting, etc, all can turn an awesome set of trails into a cluttered mess.
For aircraft trails, I usually go back to Lightroom and scan through the base files there for where the trail starts/ends and note those file numbers. Finding them in the Photoshop stack, with a very narrow hard brush set to 100% opacity/flow, paint black over the trail of light on the offending frames. Hitting ‘Alt’+Left-click on a single layer’s ‘eyeball’ will turn off all layers except for that one, letting you just paint as much as needed on each layer. Hitting Alt+click again turns everything back on.
Foregrounds! Maybe you or someone else was walking around with a headlamp at some point, maybe a car drove by or the moon came out more than you wanted and it lit up the foreground more than desired. This is where more complex masking techniques come into play. I highly recommend reading my ‘Photopshop 101 – Part 1 – Understanding Layers‘ article for tips on how to mask in an extra copy of a foreground layer that gives you the look you want.
What this Method Won’t do
At the beginning I mentioned StarStax and why I didn’t want to use it. But here’s why you may not want to abandon it all together. The decision is yours, and knowledge is power. Zoom waaaay in on your star trails, 300% or more. You’ll see small gaps in the lines created by the stars. This is due to the short moment your shutter is closed between each shot. Some cameras/intervolmeters create a wider gap than others, and depending on how long each of your shots are will determine how many gaps you have. StarStax has a ‘gap filling mode’ option that attempts to fill in these gaps. I’ve personally had mixed luck with this tool, but it’s your image, compare the two and see which you like more. A more advanced option would be to merge the two versions in Photoshop to try to get the best of both worlds.
Another thing this method won’t do is any sort of spiral or comet modes. This is a quick and easy straight-forward stacking method.
Want to see this technique in action? I demonstrated it during a Webinar on Coz’n Linda’s Happiness Hour in August. You can watch the entire session on YouTube, which covers the three primary building blocks of Photoshop – Layers, Selections and Masks – or jump directly to the star trails demo a little more than half way through. Unlocking the Power of Photoshop on YouTube
Comments
Pingback: Star Trails – Astrophotography in Motion | Fischer Photography
Pingback: Astrophotography – Seeing the Light in the Darkest Places | Fischer Photography
Awesome and thank you! I ran my stack with StarStaX and it gave me a bad distortion of my 10 mm wide angle lens. This way was better and really clean. Thank you!
Thank you, thank you, thank you.
wow – fell off chair !
Yeah, slipped right off my chair slapping my hung jaw off the desk as I went. Thanks!
This was great thank you