

Long exposure photography is one of those unique techniques which allows you to capture the world in a way impossible for the eye to match. While the eye can sense movement, it is in terms of speed that it understands the world moving around it. With a camera, by limiting the amount of light passing through the lens and reducing the sensitivity of the sensor you can truly capture this movement in a single frame.
However, what happens when your vision for what you want to capture exceeds what your equipment can capture. With a minimum ISO speed, and a small aperture, and a good ND filter even of 10-stops, in full daylight you will rarely be able to exceed a 30 second shutter speed. So to do when you want to go for a minute, two minutes, five minutes. Or if the 10-stop ND filter is safely resting in your spare bag back at the car or at home and you only have a lighter 5 or 6 stop ND because you don’t want to remove the filter for each time you recompose and need to focus.
What to do when you want to both have a shorter quarter second to 3 second shutter speed frame as well as those super long dreamy 30+ second shots but don’t have the time to setup and shoot both sets of frames.
Luckily there is an answer. And best of all, it takes minimal experience with Photoshop (or the freeware Gimp) to achieve. You need only load each of the photos you want to stack as individual layers in your photo editor of choice, and set the opacity of each subsequent frame to a diminishing value.
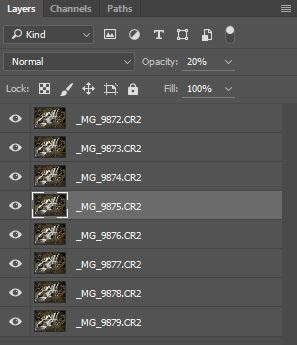
Don’t fall into the trap of thinking you just need to set each layer after the first one to 50% opacity. After all, you want each layer to have the same weight of influence in the final image, so 50% makes sense, right? Not quite. The opacity of image instead should be set to 100/X where X is the count of the images starting from the bottom of the stack.
Starting at X = 1 being the bottom most photo:
100/1 = 100%
100/2 = 50%
100/3 = 33%
100/4 = 25%
100/5 = 20%
100/6 = 17%
100/7 = 14%
100/8 = 12%
100/9 = 11%
100/10 = 10%
100/11 = 9%
And so on…
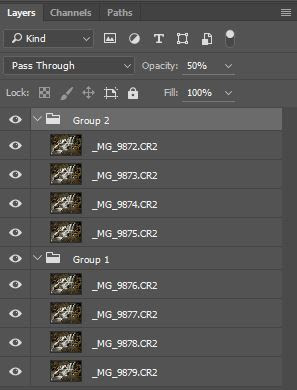
After 7 to 10 layers, the %’s start getting ever smaller and ever more precise, however Photoshop only allows you to put in whole number opacity. Now, in most cases, a half a percent or so one direction or another doesn’t matter a whole lot. However if you’re going for a really huge stack of 20+ photos, the last half start getting really small, and darn near impossible to remember without recalculating each time.
The solution, again, is stacks (of the stacks). Start by dividing your photos into equal sized groups and, you guessed it, group them. Now each group should be stacked starting at 100/1. For instance, 21 frames would divided into 3 equal groups of 7, each having a stack with opacity of 100% through 14%. Now each group is then set to the same sequence of opacity, 100%, 50% and 33%.
The sky (or at least your patience and memory card) is the limit.
 Single 1.6 second frame.

Comments
Pingback: The PNW Chronicles – North Oregon Coast | Fischer Photography