

Every photography site out there seems to have one, the “How to improve your Landscape Photography” article. Usually they have 5, or 10, or even 12 bullet points that cover the same general set of tips to taking better landscape photos. And this is mine. Why should you read it? Well, for starters, you’re already here, so you might as well. Additionally, I’m not so far removed from ‘before I knew these tips’ that I’ll assume you already know why they are important. I’m going to take the time to say what I’ve found following these rules has helped me accomplish so you might also see the ‘why’ not just the ‘what’. And, I might just shed a little light on when some of these tips might not be worth following to the letter.
Tip #1 – Use the internet to its fullest potential: Nothing will improve your photography more than being at the right place at the right time. While not all of us can find mountains and crystal clear rivers within a 20 minute drive, we can find more interesting foregrounds just about everywhere by spending a little time looking for them ahead of time. Google Maps, The Photographers Ephemeris, SunsetWx.com, Texas State Parks, 500px, Flickr, just to name a few of the countless websites I have bookmarked for research. This is most important when traveling more than a short drive from your home, but imagine your disappointment if you drive even 2 hours be completely clouded in with no chance at a sunset, or the lake shore you were going to shoot at is completely flooded up into the tree line. Not saying that you shouldn’t follow your gut, or go explore somewhere new on a whim. If the skies outside your house look interesting, go chase them, if you see a hiking trail on the side of the road, go follow it. But planning and preparation will yield more consistent results more often than luck. As the saying goes – you make your own luck.

Before my trip to Broken Bow, I knew about this old park dam – otherwise I may never have taken the trail leading to it.
Tip #2 – Don’t shoot from eye level: Even if you walk up to a scene, almost any scene, from the Alps to the Pacific Ocean and every lake, prairie, stream, pond, or canyon in between – if you just hold your camera up to your eye and take a photo, it’ll look like every other photo taken by every other photographer that’s stood right there and taken the same snap. Everyone spends their entirely life walking around seeing the world at eye level. Even if they have not stood in the exact spot you are when taking the photo, there is a sense of familiar, and thus normalcy when viewing a photo from the same perspective. This is double (or triple) as important as you get into ultra-wide lenses (18mm and wider on crop body lenses, 24mm and wider on full frame). Kneel down, drop your tripod legs down to the lowest, or climb up the flight of steps for a higher vantage point – I don’t suggest you climb a tree, but to each their own… what ever you do, don’t show the same vantage point as the ‘expected’. What you shouldn’t do is leave the boardwalks at Yellowstone National Park, at best you might get arrested, at worst your photography trip will come to a sudden end as you fall into a geyser.

Low and close to these rocks provided a strong foreground for this ultra-wide angle close up.
Tip #3 – Shoot during the Magic Hours: No, I’m not talking about a trip to Disney World, I’m talking about the hours before and after the sunrise and sunset. The hour after sunrise and before sunset is known as the Golden Hour, this is when light is soft and warm, ideal not only for Landscape Photography, but also portraits too! Shooting towards the sun will yield golden silhouettes of trees, reflections of the sun off water, brilliant sun-stars as the sun peaks between clouds.
Shooting at 90 degrees from the sun will yield contrast between the sunlit side of mountains and it’s opposite in shadow creating sense of depth and interest. Clouds, especially tall cumulus take on great detail, even rolling hills have extra texture and depth. Shooting opposite the sun is probably the most overlooked option when shooting in Golden Hours, the sun is over your shoulder, the warm light flowing in from behind. Be extremely careful not to cast long shadows yourself into the frame, but with the right mix of clouds and scene, it’s well worth a try. By getting up even earlier, or staying out yet longer, you also have the option of the Blue Hour. Once your eye seems to say that the light show is over, the sunset has all faded, crank up the exposure time to a full minute or longer and see what the magical Blue Hour can show. This is a great time to aim opposite the sunset if long shadows prevented it during the Golden Hour.
The weather can have a profound impact on the quality and duration of these two periods of light. Mid-summer, cloudless skies will make Golden Hour seem more like Golden 5 Minutes. Catch the tail end of a spring rain storm as the sun sets, and you might have light that seems to last for days.

The calm of Blue Hour – 30 sec shutter speed, don’t forget the tripod!
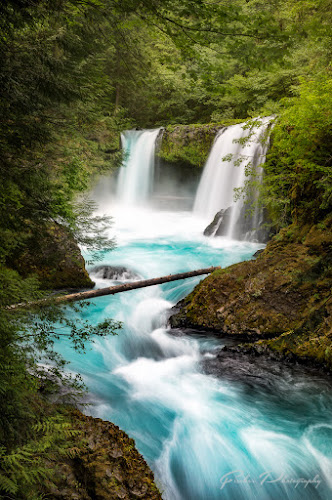
Tip #4 – Use a Tripod and remote shutter release: If you’re following Tip #3 above, you’ll soon realize the worth of a tripod, and a sturdy one at that. Without shooting wide open (which will prevent you from getting everything in focus) or at extremely high ISO range (which makes a noisy mess of your beautiful shot). Using a tripod will allow for longer exposures – making waterfalls soft, clouds move, seas get misty and ISO stay low. Unless you are in moderate winds or submerged in flowing water with a less than rock solid tripod, turn off IS/VS on your camera/lens if equipped. Some new lenses can auto-disable IS, but most still cause more problems than it solves when you’re on a tripod. Trust me, I’ve forgotten this more times than I can count, and cursed my haste every time. If you don’t have a remote shutter release, you can use the camera self timer, but that makes it quite tricky to get the moment the sun hits the horizon, or wave breaks against the coast.
But here’s the real trick – do not keep the camera on the tripod. By all means, lock that camera down when you’ve got your composition and ready to take your final perfectly sharp final shot. Do not, however keep the camera on the tripod at all times throughout your shoot. Just like putting your camera on a tripod will help you slow down and consider your composition more carefully, being bound to it will likely make you pass up even better compositions. When you’ve got ‘your shot’, pull the camera off the tripod, get your eye up to the viewfinder, or click on Live View and move it around, zoom in and out, hold it up high, get it right down near the ground or water level. Find that unexpected perspective I went on about in Tip #2. You’ll likely need to readjust the legs on the tripod to get it setup in this new composition, which is exactly why I say take it off in the first place. Chances are, you would have never seen that next / better / alternative view had you kept the camera on the tripod.

30 seconds – a completely different look than had I shot this hand held at 1/80th
Tip #5- Follow (or at least understand) the Rule of Thirds: If you’ve made it this far into the list, you’ve probably heard of, and hopefully understand the Rule of Thirds. For landscape photographers, we usually dwell mostly on the horizontal two lines, dutifully placing our horizon on one of those two lines, maybe even trying to place another strong horizontal element near that second line. And if at all possible, we’ll try to find a big tree or mountain peak to stick on one of the vertical lines. Starting out, absolutely stick to the ‘Rule’ more often than not, but don’t try to place something on every single line. First, you’ll pass up a lot of amazing shots because you can’t get them to fit into the rule, and second, you don’t have to make it perfect. Consider the intersections of the rule, if you have a tree there, but the horizon elsewhere, that’s still playing by the rules.

The tree sits on the rule of thirds, and that’s all it needs.
Tip #6 – Patrol the edges of your frame: Photoshop can do a lot of amazing things with clone stamp, patch tool, healing brush and the like. However, it has its limits and wouldn’t you rather be out shooting beautiful landscapes than spending hours trying to remove a branch, a bench, or something else out of the frame when you could have just taken a zoomed in or out a touch, or taken a step to the left or right? Catching half a flower in the corner of the frame, placing the edge of a mountain at an awkward position, not providing enough head room above the mountains or too little lead in from the bottom for a leading line to pull your attention through the frame. This is part of that ‘getting it right in camera’ that you hear about that can be really difficult to correct in post processing.

Imagine if I had cut off the bottom any further than this – patrol the edges!
Tip #7 – Shot in RAW: Someone is going to be asking themselves about now “why is this all the way down at #7”. The answer – because shooting in JPG and following all the tips above is going to yield in better photos than shooting in RAW and processing the pixels out of the resulting images. I still look back at *some* of my early photos, before I switched to RAW, that I got “right” in camera that didn’t need much of anything in editing where the JPEG was good enough. However, there are others, many many others, that certainly could have used the added dynamic range recovery and editing flexibility that comes with shooting RAW. Shooting in RAW becomes ever more important as you start to push the limits of your camera, in ISO, in shadow recovery, to be able to pull additional color and detail out of areas that a standard camera JPEG processor might not value and throw out. Take a waterfall for example, say Bridal Veil Falls in Oregon. Nice, but fairly contrast heavy light filters in from above, your camera takes a lot of that light bouncing off the waterfall and exposes for that, under exposing the rock around the falls. A JPEG might value a lot of that rock as pure black, where the RAW file will have some information there that can be slowly coaxed out of the shadows enough to show detail and soften up that contrast nicely.

Shadow Recovery from a RAW file
Tip #8 – Use Auto-Bracketing for high contrast situations: Along with #7, this tip will help you solve the biggest weakness that your camera has over your eye – dynamic range limits. Back at the waterfall above, or in the depths of the forests of the Sierra Mountains, or standing on the edge of the Grand Canyon, you’re going to see the sky and you’re going to see detail in either the sky, or the rest of the frame. Bracketing your image, taking multiple photos at different exposure levels, overcomes the physical limitations of your camera’s sensor – giving you good clean foreground detail without trying to ‘pull’ that detail out in post production with lots of noise. For best results, use a tripod, use a remote shutter release, and shoot in RAW. If you do not have flowing water, I suggest varying the shutter speed to adjust the exposure, if you think you’ll be blending water exposures, varying the aperture may be a better option.
Next – do not, I repeat, do not, fall into the “HDR Hole”. There will be temptation to throw these bracketed frames into programs such as Nik HDR Efex, Photomatix and the like, dial the Tonal Contrast “up to 11” along with the saturation. This, my friends, is what they call the HDR Hole. A time period that many photographers go through where their photo quality falls into the hole of over HDR’ed images. I went there, luckily for a fairly short time. And while there is a time and place for most any style of processing – landscapes and the heavy HDR look rarely go hand in hand. Starting out, using the new Lightroom HDR or Photoshop HDR blending is probably your best starting point. Your images will look flat, but once you have detail throughout your image, you can easily start building contrast back in where you want it – not where your camera demanded it.

The HDR Hole – circa 2013.

Bracketing allowed me to control where the light and the dark existed in this image.
Tip #9 – Look for contrast: Okay, I just got done spending two entire Tips explaining how to reduce the effects of high contrast and now I’m saying go look for it? Have I completely lost it? No, not really. Well, not in that way. Here’s what I mean – look for ways to capture the depth of the world, you’re creating a 2D photo, to be viewed on a 2D monitor or print, but you want it to look like the viewer could walk right out of your lens and into your world. Contrast is the tool by which this is accomplished. And there are may types of contrast – not only from darks to lights, from saturated to less saturated, from high detail to soft, and even high contrast (light/dark) to lower contrast (light/dark). By making the foreground the most detailed, with the sharpest detail and most saturation, and the background less so, you are adding depth to your image.

Contrast changes = depth
Tip #10 – Adjust and Adapt: One list of tips that I read not long ago said something along the lines of “you may come back empty handed”. NEVER. Unless the weather conditions are unsafe to shoot for either you or your camera, there are opportunities for photography. It may not be the photo you went half way across the state or country or even world to capture, but allowing yourself to be defeated by the weather or light or other conditions leaves so many amazing shots undiscovered. A landscape photographer’s worst enemy is clear blue skies at high noon, or even at 30 minutes before sunset. However even flat overcast skies allow for even soft light that looks great for ‘macro landscapes’ – zooming in on small elements of the scene. I’ve shot in sleet, I’ve shot in light rain, in single digit temperatures, I’ve even shot in that dreaded clear sky condition. If nothing else, make it a learning experience.
Experiment, try something different, look for patterns in the light, look for interesting shadows across the sand, zig-zag tide pools in the fog, anything that takes you out of your comfort zone and makes you grow as a photographer is time and energy well spent. Mother Nature will rarely give you exactly what you want, when you want it. It’s great when she does, and make the most of it, but don’t become discouraged when it’s not the scene you envisioned. Even when you spent days of research (Tip #1), being able to adjust and adapt is your greatest ally against an unpredictable world. Just know there is a time and place to say ‘it’s time to go find a beer and a good night’s rest before we try this again tomorrow.’

Get off Tripod, Get Low, Get Contrast, and don’t you dare give up.
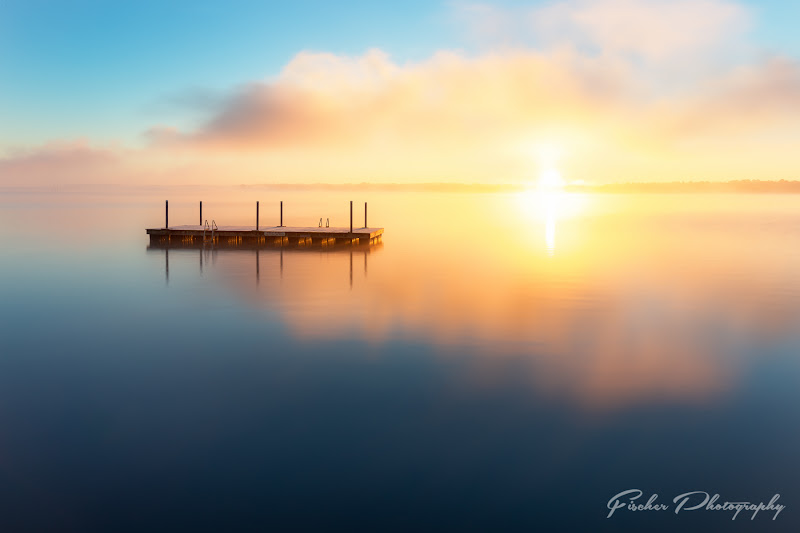
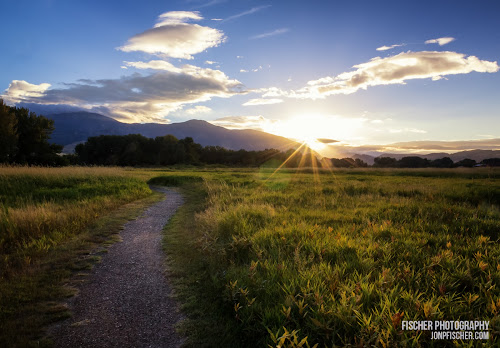
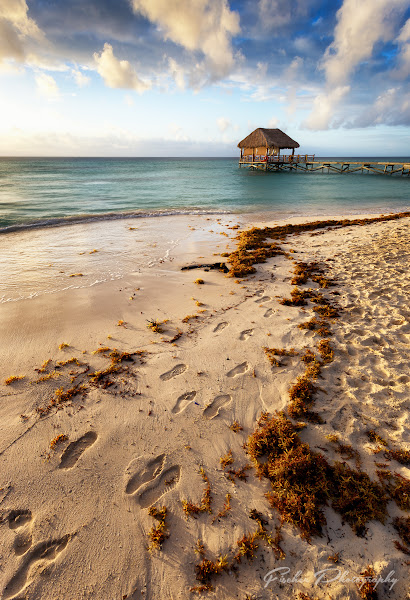
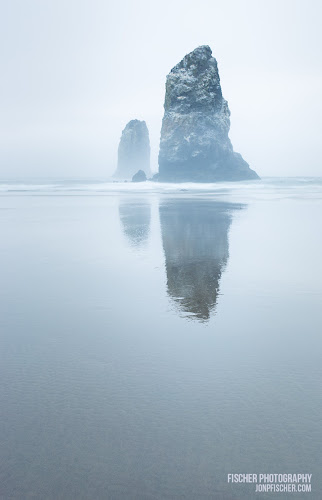
Identify the Tips key to these photos:

Comments
Pingback: Landscapes 201 – Preparing for the Shoot | Fischer Photography
Pingback: Landscapes 201 – Adjust and Adapt | Fischer Photography
Pingback: Landscapes 201 – Composition | Fischer Photography