

When myself and a group of six other photographers started discussing where we wanted to go on a Pacific Northwest photography adventure one name kept coming up: Thor
What does the Norse God of Thunder have to do with Oregon? It is the name of a geological formation on Cape Perpetua on the central Oregon coast. I had been there once before, two years prior, and while I was happy with the photos at the time, having researched other photos at the location told us one thing – sunset was the time to be there.
| Date | June 03, 2016, 09:11:29 AM |
|---|---|
| Location | Cape Perpetua, Central Oregon Coast |
| Camera | Canon EOS 6D |
| Lens | Canon EF 24-105mm F/4L IS USM |
| ISO | 50 |
| Exposure | 30 sec |
| Aperture | 14.0 |
| Focal Length | 32mm |
| Exposure Program | Aperture priority |
| File Id | _MG_8359-Edit |
The Shot
Now, the first thing you’ll need to know about the photo above, is that it is not, in fact, Thor’s Well. That in fact sits just a little ways off frame to the right. What the photo in fact captures is one of the many churns, this one not quite big enough to be named, that flank both sides of the crest of rock within which Thor’s Well sits. After nearly getting myself and my camera gear soaked more than a half dozen times capturing what I could of the Well given the high conditions of the surf, I started to retreat from the edge of the crashing waves a little bit and setup for this composition.

THIS is Thor’s Well – note complete lack of sky, because there was zero interest in it.
The sun had just set, and with little to no clouds in the sky to speak of, the color was quickly starting to fade, however there was still enough light to pick up some faint reflections on the rock, and with longer and longer exposures quickly being possible with the fading light I wanted to capture a shot that took the crashing violent sea and turned it into that misty calm you see from photos of 30 plus seconds. The dark volcanic rock would stand out starkly against the water – at least that was my intent.
After taking the first few photos I came to the realization that 30 seconds just wasn’t quite long enough for the soft water effects I was wanting. The water was starting to get foggy, but it looked like rough lumpy cumulus clouds, not soft uniform stratus clouds I was going for. Still close enough to the water’s edge that I didn’t want to risk changing out filters or other gear, I opted for the ‘free’ long exposure booster – taking multiple photos. Each additional photo would be later stacked in Photoshop to get the water effect I wanted – and if by chance I was caught by an extra large wave only one photo of 20 or 30 seconds would be discarded, not the entire 60-90 second shot. Of this exact composition, I took 4 frames, one 3-shot bracketed set, and one additional shot of with zero exposure compensation. The two zero compensation along with the bright frame would make up the foreground and water, while the dark frame would be blended into the sky so that it would not be overly bright and blown out without color at all.
Processing
The processing of this photo presented a couple of challenges. First, blending the 3 frames I had shot for the foreground and sea in a way that resulted in the best looking water possible. One frame in particular had really nice looking water right up front in the immediate foreground. A wave crashed into the rocks right at my feet that sent an extra dose of water through the volcanic rock on which the setting sun reflected some beautiful light back up off of. The other three frames didn’t have this nice water look up front, and doing a normal blend of 100%, 50%, and 33% on each frame would diminish the single frame’s water up close.

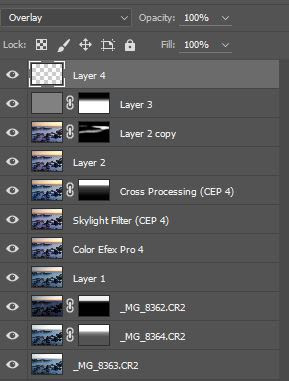
3 Layers Blended
The easiest solution, often being the best solution, was to employ layer masks on each of the layers above the base layer – which I had set to be the frame with the best water look at the bottom – and only blend in these additional frames from the edge of the foreground rock and beyond.
The dark frame was masked in only from the horizon and up, it’s foreground being too dark to be of any value to any of the water smoothing effects or rocks in the foreground.
As with most of my photos, the next step after the initial blend of base frames is to take the merged layer into Nik’s (now Google) Color Efex Pro 4 plugin. There are a couple of filters in this plugin that I use a vast majority of the time. First is Pro Contrast, the Dynamic Contrast slider (third slider down) works magic on many photos to pull just enough detail out without being heavy handed. I normally use this slider only to around 20-30% strength and will often use the Nik plugin’s Control Points to selectively add or remove the effect from certain areas of the image. In this case, Dynamic Contrast added a lot of detail back into the water within the churn that I had worked to soften up, so that was very quickly removed with a control point set to 0% opacity. The other filter I often turn to, is the Skylight Filter. I don’t know how it does it, but a little dash of this magic creates wonderful colors to nearly any photo taken during Golden or Blue Hours where the light might not have been ideal.
For this image, I dived back into Nik one last time, just for the sky. The Cross Processing filter has some interesting color shift effects, and for this image I felt that the foreground and the sky colors were just not playing well together, the sky was too warm after the Skylight Filter being applied throughout the image, opting to shift the color with Cross Processing instead of simply painting out the Skylight filter effect with a layer mask allowed me to keep the saturation of the sky which the first filter had applied, but toning it in a way that felt more natural to my eye.
Still not satisfied with the softness of the water, a duplicate layer was next created with a soft blur applied, and masked only into the water within the churn. Using this same layer, and selecting only the sky and the very edge of the horizon, I applied a very strong motion blur at 0-degrees, blending the tones in the sky and blurring out one small cloud that kept catching my eye on the far left edge.
Final steps were a High-Pass layer created and masked just to the foreground to sharpen the rocks, and a little bit of color-dodge-burn work with an empty layer set to Overlay. Brushing light warm hues on at very low opacity I was able to pull some of the reflected light on the rocks and again soften and brighten the water in the foreground and churn.
img right: Top shows the RAW files straight out of camera, the middle frame shows the same RAW file with initial Lightroom Edits and the bottom frame shows the final edited photo.


