
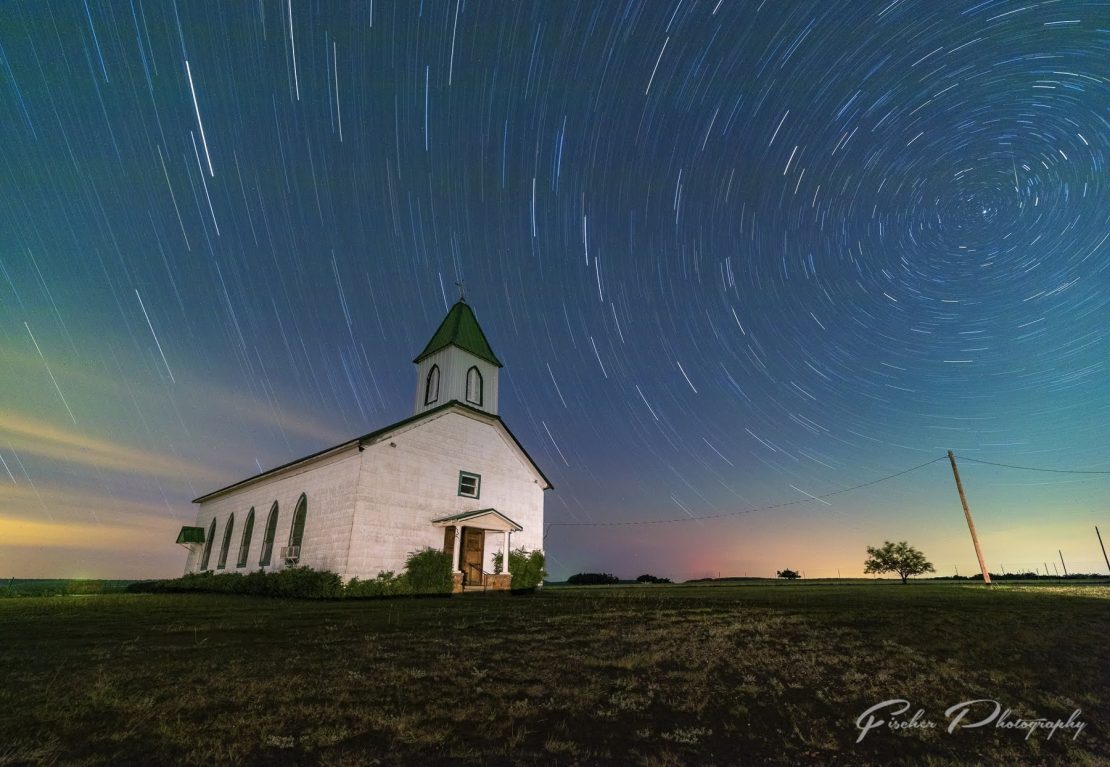
Seeing as one of my most popular articles here in the Learning Center is my ‘Stacking Star Trails in Photoshop CC’ – decided to share this non-stacked single frame star trail to show what can be done with a single exposure – as well as the challenges in capturing them. Where most star trails are shot at around 30-60 seconds per shot and then stacked with either Photoshop of another specialized application such as StarStax, this photo was taken in a single 2100 second exposure… doing the math, that’s 35 minutes!
| Date | June 17, 2018 |
|---|---|
| Location | Dodson Prairie Church |
| Camera | Canon EOS 6D |
| Lens | Rokinon SP 14mm f/2.4 |
| ISO | 200 |
| Exposure | 2100 sec |
| Aperture | f/4.0 |
| Focal Length | 14mm |
| Exposure Program | Bulb |
| File Id | _MG_0350 |
The Shot
Dodson Prairie Church is located in what I’d call North Central Texas, west of DFW, but not ‘West Texas’ by any stretch of the imagination. It’s a beautifully preserved church that is still in use today, and to shot there overnight requires getting in touch with the care takers to get permission to be on the property. As you can probably tell by the position of Polaris in the photo above, the front of the church faces east, meaning to shoot out in front means facing west – not ideal for Milky Way for much of the year. But still it is a fairly dark sky location that I like to get out to once every year or so just because it hasn’t been ‘over done’ like so many other locations close to my home in Dallas.
Single frame star trails is a concept that I had started playing with after a trip to Death Valley with another photographer friend of mine a few months prior to this shot being taken. He had explained how you could shoot at ISO 6400 for 30 seconds and it would give the same exposure within the frame as a shot taken at ISO 100 for 30 minutes. Let that sink in for a moment, and yes, the math does check out. So you can do a couple test shots at 6400, adjusting aperture, and get an idea of what a 30 minute single exposure would look like. Ideally, this shot, I would have stayed at ISO 100, not 200 that you see in the EXIF info above, and shot for a full hour. However it was already getting late, and I wasn’t sure how much longer we wanted to stay on location, so to get the exposure I wanted, I bumped the ISO up a stop, and pushed the exposure out to 35 minutes. The Rokinon’s ultra-wide 14mm focal length on my 6D allowed me to capture everything from the North Star in the upper right of the frame, and still frame the church nicely using the Rule of Thirds.
Light painting of the church (and a bit too much of the foreground grasses which had already started to turn brown from the Texas summer heat) was from a passing car or two during the long 35 minute exposure. Trying to light paint something the size of a church, evenly, is always a challenge. Trying to get just what you want lit, and not what you don’t, without hot spots, is always going to be a challenge. In the past I’ve used my excellent Litra Cube torches, small but powerful lights, to do the job. They worked well for me in Big Bend for shorter exposures of the Milky Way, and I had them out in use during this shoot earlier in the night. Passing car headlights from down the road though, it’s sometimes hard to beat the unexpected.

Original unedited in Lightroom – there’s color there, let’s find it.
Processing

For those who might think that I added a bunch of artificial color into the sky between the Straight out of Camera shot shown at the end of ‘The Shot’ section and the final edit, here’s my Lightroom sliders showing the transformation. The only thing not shown in the Lightroom screen shot is the White Balance sliders, which were adjusted to a cooler tone from 3750 to 3429. Everything else is just pulling the colors that were already in the photo out of the original RAW data. Shooting in RAW is essential for any type of photography that is going to undergo any significant amount of editing. If you’re not shooting in RAW now, I highly recommend starting, yes it’s more work to get the photos to a presentable state, but the pros far outweigh the cons for landscape and astrophotography especially.
This photo follows fairly closely to what my normal work flow is for preparing an image for work in Photoshop. Bringing the Highlights down, shadows up a bit, in this edit I liked the look of just a little additional clarity and dehaze, for landscapes I often find myself going negative on clarity just a touch these days, but to get the nice crisp star trails against the blue, I opted for a bit on the positive side this time. Not seen in the screenshot is a boost to lights in the Tone Curve, as well as standard camera lens corrections and sharpening/noise reduction adjustments.
And now a note on noise. I’m not going to lie, shooting at ISO200 for over 30 minutes is going to create some noise. As your camera sensor is active gathering data – either by using live view or during an exposure, its going to heat up. And heat is a noise generator. The low ISO of this image helps combat that introduction of noise to a fair amount, as does using a camera such as the 6D which has a fairly low resolution full frame sensor. The bigger the pixels on the sensor, the easier it is for the sensor to win the noise vs signal war. I recall shooting a 5 minute exposure at a higher ISO with my old Canon 60D crop-sensor body, the result was an awesome effect on the clouds I was shooting in the Grand Tetons, but zooming in there was this speckled color noise that was just a killer. Lessons learned and I’ve been trying to find the balance point between the two ever since. Every camera body is different so you’ll just need to go out and experiment – preferably before you get to a Once in a Lifetime location!

Double Edit in Lightroom
For this edit, I dual-edited the original RAW file in Lightroom. Following my preference to get things as close to perfect in Lightroom as I can – and often that can take multiple photos or multiple copies of a single photo edited in several ways – I wanted to get the color of the church closer to white, and pull some of the saturation out of the foreground grasses that was distracting from the sky colors above. These two versions were then sent into Photoshop as individual layers which I could then blend together as the starting point for the final edit.
This may look like a scary number of layers, but really, about half of them are just very methodical spot-healing to get rid of the distracting lights along the horizon and careful noise reduction steps. From the bottom we have the two layers brought in from Lightroom, the bottom being used for the sky, the second for the church. The Color Balance layer went another step to correct the color of the church to remove any remaining color casts.
Layer 1 above the first Color Balance is my first step in reducing noise using the ‘Dust and Scratches’ filter in Photoshop. I’ve found this to be one of the best tools for removing the speckle color noise that ultra-long exposures creates. You’ll note that there’s a Layer Style applied to this layer denoted by the icon on the right of the layer. I adjusted the ‘Blend If’ tool to remove this layer from the brightest areas, keeping my star trails from being altered by the Dust and Scratch filter. Layer 1 Copy is another noise reduction step, this one is set to color to continue removing the speckle noise. Noise fighting continues in Layers 2 and 3 – likely with the help of the Camera Raw filter, should have labeled those back when I did this edit!
The next several layers are either bringing in more contrast and color to balance the composition, or slowly removing those pesky lights on the horizon. A single dodge/burn layer (empty layer set to Soft Light which I can then paint onto) is used on this edit, in this case to darken up those grasses up front that were highlighted by the passing car headlights. And the final layer up at the top is my take on an Orton effect that I first learned from Mark Metternich. I call this ‘Soft Orton’ for two reasons – first, it uses the Soft Light Layer blend mode and a high power Gaussian blur (90+ depending on camera resolution), but also that the effect it produces has a very soft effect to the overall image. Many ‘Orton’ style effects that I’ve read or tried cause far too much localized blur for my taste, and while can be effective in extremely limited amounts with masking, I find this soft Orton to be much more useful in larger regions of the image to bring depth and color to the image.

Wrap up
I hope you have enjoyed this behind the scenes discussion of one of my favorite Star Trails images from 2018. I am looking forward to more opportunities to experiment with ultra-long exposure single frame star trails this year. One thing I’m wanting to work with is using longer focal lengths with this technique to create more striking night abstracts. The night sky offers and endless number of imaging options, if one is willing to put up with the sleepless nights and then time in front of the editing screen to bring out their best. My hope is that this has inspired you to go out and try some of these techniques for yourself. Want to try out astrophotography but don’t know exactly where to start? Check out my other articles here in the Learning Center for my Astrophotography articles, or contact me for one-on-one tutorials either in person or via Skype.