

My birthday gift from Mother Nature came a couple days early in 2019 as I awoke to the sight of dense fog outside my hotel room in Hochatown, Oklahoma. Wake up call came well before dawn, and only the lights of the parking lot outside gave any indication to the heavy blanket of fog outside the hotel room door. In an instant my original plans for a vivid sunrise vanished, replaced instead with new ideas and new locations that I had scouted on previous visits to the area. Grabbing our gear, Micheal Rung and I quickly were on out the door and headed for the banks of the Mountain Fork River within Beavers Bend State Park.
Our destination was a section of the ‘Bend’ where I knew there was several stands of cypress trees that would make excellent subjects. There is a near a bridge and swimming area from which we could shoot up the river, putting a good amount of separation between ourselves and the cypress trees that stood in the shallow waters of the river a short distance away. I had shot from this location a few times before in a variety of weather conditions, but never in fog like this morning had dished up for us.
| Date | April 5, 2019 |
|---|---|
| Location | Beavers Bend State Park |
| Camera | Canon EOS 5D mkIV |
| Lens | Canon EF 70-200mm F/4L IS USM |
| ISO | 50 |
| Exposure | 5 secs |
| Aperture | f/9 |
| Focal Length | 78mm |
| Exposure Program | Aperture priority |
| File Id | _MG_9577 |
The Shot
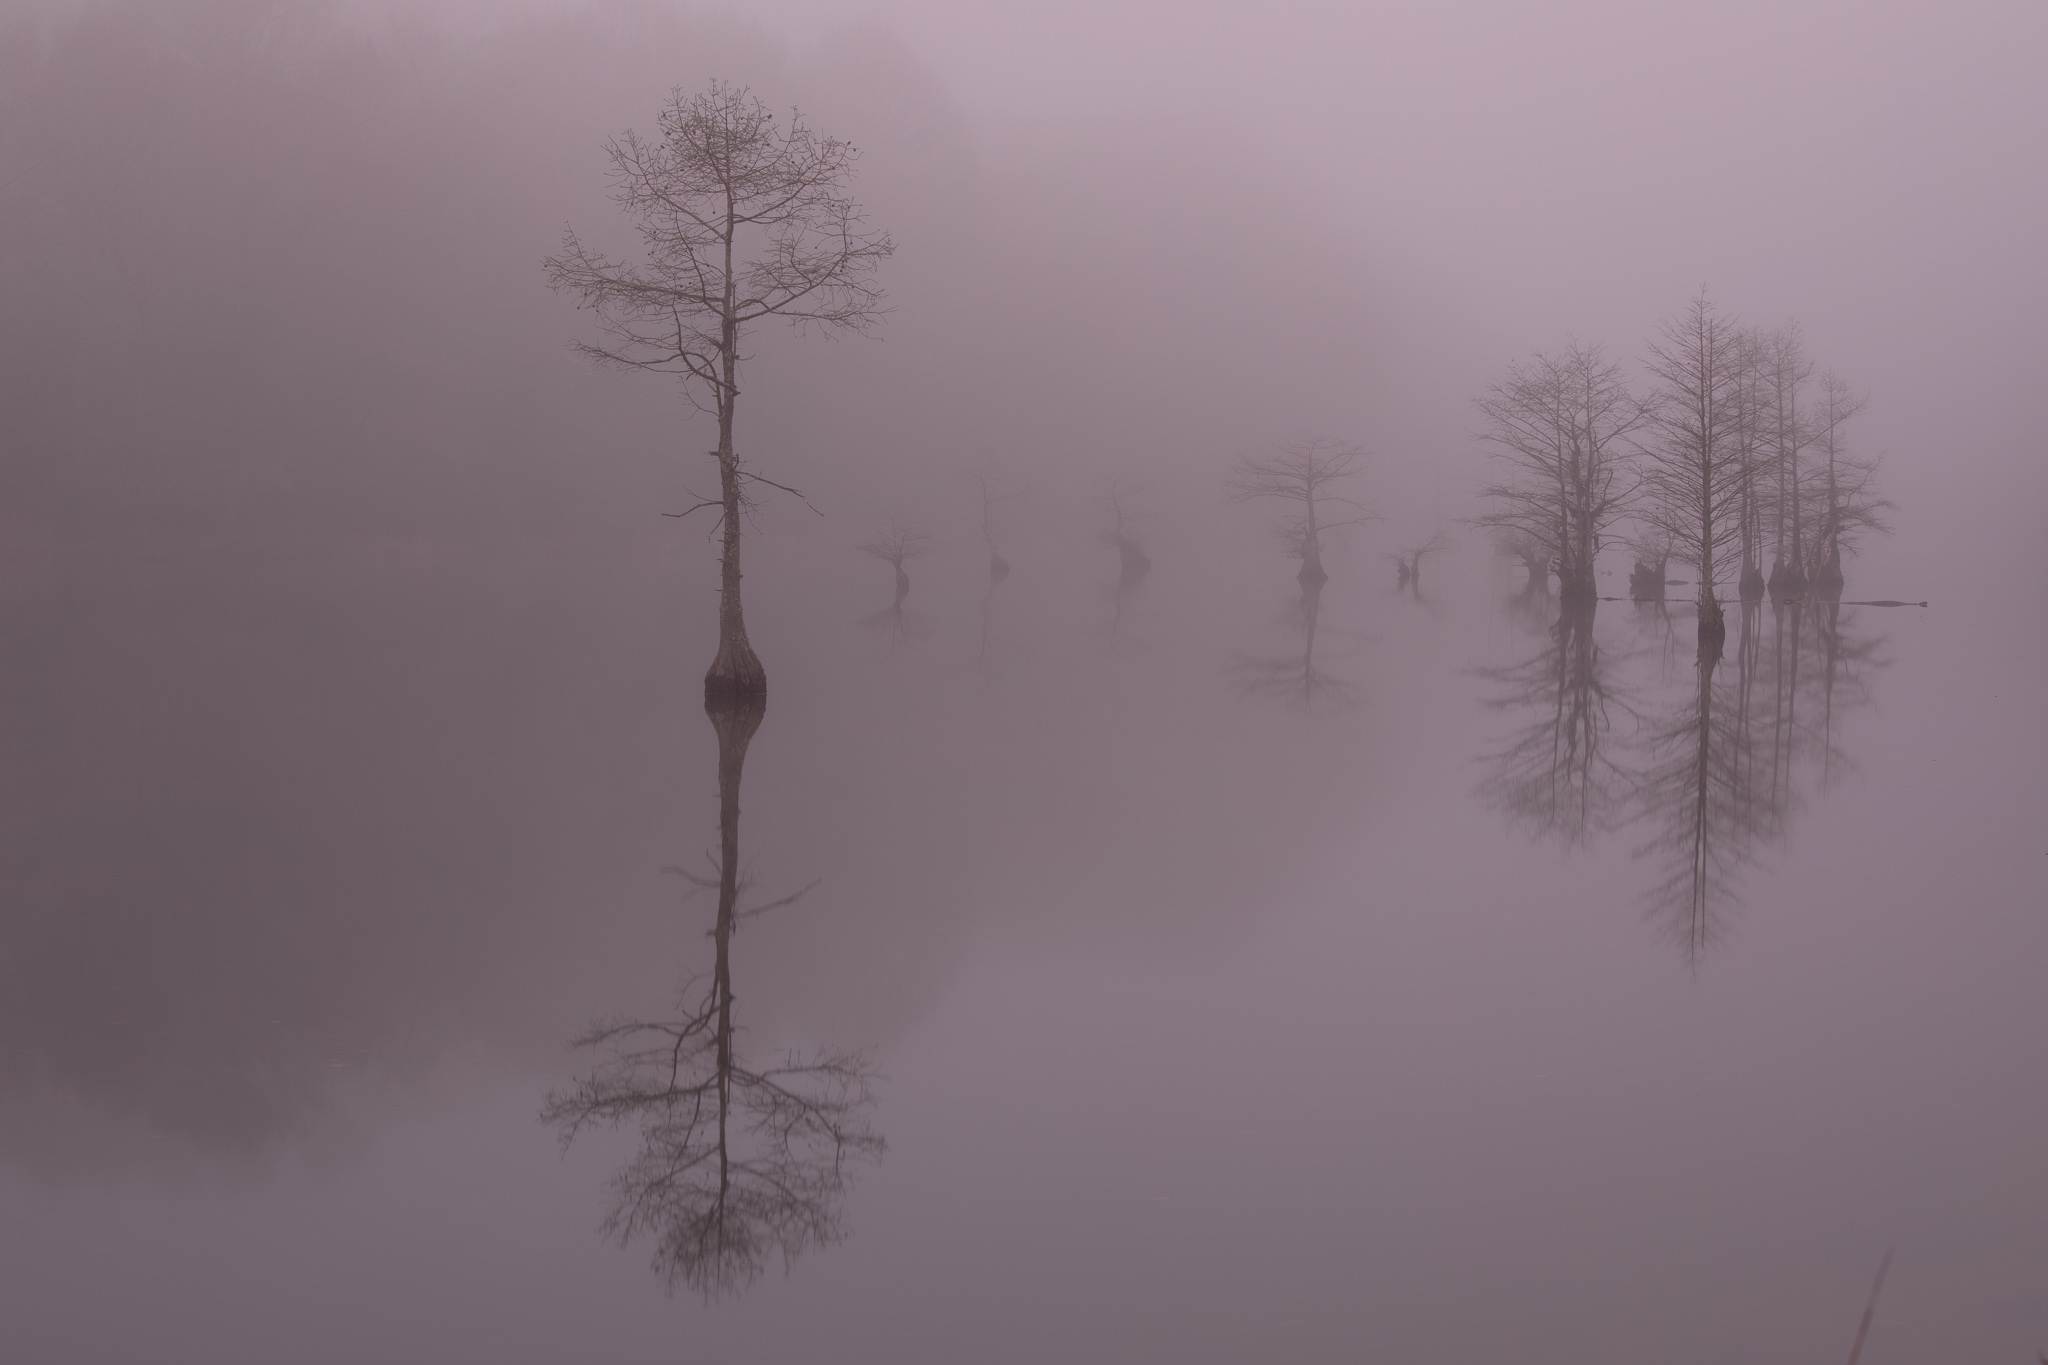
Arriving on location just shortly before sunrise, the entire area still enveloped with thick fog, it was difficult to see anything beyond a few dozen yards away. Working a few different compositions from a couple locations along bridge I decided that the clump of trees I wanted to use as a subject were too far away, instead moving out to a small island that protects a swimming area from the rest of the river. From here I had a much better view of the trees. They were close enough that the fog did not obscure them too badly, but I still had view that was mostly up-river meaning everything beyond was fading quickly away into oblivion in the distance. From this slightly closer vantage point on the island instead of the bridge, I could pick out a variety of compositions from the stands of trees in the water from one location making the most of the conditions, not knowing how long they would last.
Foggy conditions area ideal for minimalist and nearing on abstract compositions by utilizing a telephoto lens and the soft background to isolate subjects from their surroundings. By using longer focal lengths you are choosing to include fewer elements of the landscape within the frame. For this image I used the EF 70-200mm f/4 lens, which is one of my favorites for telephoto landscapes. The focal range is very flexible and the lens is light enough for me not to think twice about putting in the bag in the morning. One of the advantages of shooting with a telephoto lens, without moving more than the tripod’s ballhead and lens’s zoom ring, you can pick out dozens of compositions.
Shot at nearly the widest focal length available with the lens, in this image you start to pick up the faint outline of the treeline on the opposite river bank, which gives a little more context to the location, but also reducing the abstract feel of the shot. I felt this was a worth while trade-off to include the larger tree on the left side of the frame that helps balance the stand of trees on the right. If the background tree line wasn’t there at all, I believe the composition wouldn’t work as well, the lone tree on the left isn’t strong enough to balance the clump of trees to the right, but with the faint outline of the trees on the left keep things in check. As you’ll see down in the processing section below, during edit I used several adjustment layers in Photoshop to help find the perfect balance of this background element against the soft foggy mood.
As one of the earlier shots in the set that morning, before much light had started to fill the river valley. To ensure the smoothest reflection possible, and the cleanest RAW files possible, I selected the lowest ISO my Canon 5DmkIV has at 50, and stopped down to a moderate aperture of f/9. The low ISO and stopped down aperture resulted in a multiple-second exposure without the need for any ND filters. This long shutter not only eliminated any minor ripples on the water, but also made any variations in the fog fade to an even blanket. Looking at the histogram now after the fact, I should have probably included a little bit of exposure compensation to push the exposure ‘to the right’ a little more to ensure even better noise control and detail, but I’m sure I was more focused on compositions in the moment and failed to pay enough attention to the histogram on the back of the camera. As it is the histogram starts out bunched up in the mid-tones, which with the low ISO and excellent 5DmkIV sensor gives me little to worry about.
Compare the featured image to the gallery of other images below it, taken on the same morning. Choices of focal length and composition dictate how much context the viewer has to the world as a whole. How much of the entire scene is shown also influences the decisions made during editing as each image speaks to what it wants to ultimately become in order to convey the feeling and mood that I want. Quiet scenes such as this can be interpreted in so many different ways by both eye and the soul. These decisions are just as important the creative process as capturing the image on location and is what we will discuss next in the Processing of the final photograph.


The Processing
Soft and peaceful as the morning was, there were a lot of directions I could have gone with this image. As the collection of images above that were taken at the same time show I experimented with a number of these looks across the set. They all do have some of the same elements to their final look. Soft, ethereal and high key backgrounds prevent the fog from becoming dreary and depressing looking, while allowing the background trees to fade out almost completely greatly increasing the sense of depth. They also have some subtle feeling of a source of light, which elevates the hope and peace to the image as a whole. These were conscious decisions I made during the creative editing process, I could have also made the set far more moody and foreboding with different decisions during processing. However that was not the feeling that the morning had to me and had a direct influence on the direction all of the edits, as varied as they were, took.
I shoot on Auto White Balance the vast majority of the time. In most cases, my Canon DSLR camera does a great job of choosing a natural starting point for white balance. However, there are a few conditions that can result in some really poor choices by the camera. The one that I encounter the most is during the ‘Blue Hour’, especially when running long exposures. It’s something I have noticed on a variety of shoots, and this morning was no exception. In the camera’s attempt to find a neutral white point, it creates an image with an extremely strong magenta color cast. If you were shooting in JPG, this would pose a very difficult problem to overcome and correct, but since all my images are edited from the original RAW data, I just throw what the camera decided to the side and dial in a more appropriate white balance starting point for the image. Below you can see the image as it was imported into Lightroom and the image after initial Lightroom adjustments including White Balance and some initial contrast work.

I knew I wanted to create a soothing and calm final image, and I didn’t want it to be dreary and dark, even though one could have interpreted the morning as such. So while I aimed for a much cooler white balance, I didn’t want the background to be depressing. To avoid this, I used a healthy dose of ‘Lights’ boost in the Lightroom Tone Curve section, in addition to ‘Whites’ in the Basic panel. I most often use these two sliders to control the right side of the histogram rather than using the overall exposure slider to the positive direction. The only adjustments to the shadows side of the histogram came from a very minor adjustment to the Clarity and Dehaze sliders to give the image just a touch of pop against the highlight side boosts.
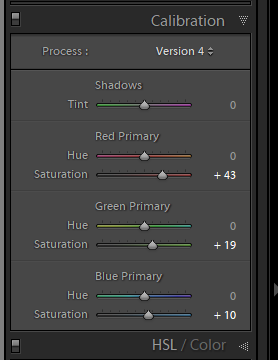
Color adjustments are fairly typical of most of my initial Lightroom edits prior to moving into Photoshop. A mild boost to Vibrance with a nearly equal reduction in Saturation. This makes colors more equally present in the image. In this image since cool tones are so dominate, it was vital to bring a little more of a color mix into the tree trunks and other areas to give some color contrast. Calibration channels are fairly standard for what I usually end up with as well, these days I tend to give the Red Primary a little more boost than the other two, I have found this gives a nice saturation mix that works well in many landscapes. Since this image was already so blue-tone heavy I was very gentle with the Blue Primary as it would have been very easy to overwhelm the image with cool tones. While the HSL panel can help balance this, for this example I just avoided the problem to begin with as there were not enough other colors to make pushing this channel worth it.


Beyond the pictured adjustments, Detail section was my Lightroom import standard Deconvolution presets of Amount: +80, Radius: +.05, Detail: 0. I did bring the Masking up slightly on this image. I often leave this at 0 and have a separate Lightroom virtual copy with no sharpening for skies and other areas I do not want any sharpening, but since so much of this image was already soft, and trying to mask around the trees wasn’t going to give any better result than letting Lightroom do the masking for me.

Looking at the final image you might think the edit was a couple layers at most, but these soft and subtle images can be just as difficult to edit as the big bold sunsets full of color and contrast. This is because every adjustment is amplified when everything is so evenly toned to begin with. Adding too much saturation in one area or adding a little contrast in a couple trees can very quickly unbalance the entire image. This is why I ended up with as many layers as I did. After every step I will sit back and examine the photo zoomed out looking for issues that the previous adjustment has created. If I can’t back off the adjustment to bring things back into balance, further shifts are needed to bring all of the elements back into harmony.
Starting from the bottom, the first change I made was to extend the canvas of the image to the right some, the trees were originally cramped against the right edge. Advantage of a foggy background is that you can simply stretch a section of empty space on the far right to cover the new canvas to give more room that looks very natural. The second layer is where I brought a set of new color tones into the image from the original. As seen up to, coming into Photoshop I had an image that was predominately blue tones, but I wanted a slightly more mysterious feel for this image. To achieve this look I went to one of my favorite secret weapons of color for subtle color toning – Color Efex Pro 4; specifically the Cross Processing filter. I use this filter on a fairly regular basis to play with the color harmony in an image, especially on images that are more abstract in theme than grand landscape. This can help create a ‘wall-hanger’ look that would be very pleasing to have in any decor.
Basically from the third layer from the bottom all the way up it’s just subtle tweaks to the tonality or exposure to keep everything in balance as previously mentioned. Keeping color harmony is key in largely monochrome images, this is especially important when doing burn and dodge work with pixel layers set to Soft Light or Overlay. For this reason, I always use the color picker to start with a color that exists in the image near the area I will be burn or dodging and then adjusting the luminosity to achieve the effect and strength I need – and always at a very low saturation. Resampling colors often when moving from area to area, especially if switching from burning the water or background fog to dodging the trees for extra contrast.
None of these subtle adjustments would be possible if not for extremely targeted masking. For this Luminosity masking is a vital part of my editing process. With very low-contrast images like this default masks can be too flat to be selective enough. This is where I really like the TK RapidMask panel’s ability to very quickly modify masks to get just the right mask that is needed for the adjustment. I usually start with the closest mask that I can find to what I want and then use the ‘Levels’ button on the RapidMask panel to fine tune the mask. For the example below I took the Whites-1 mask (on left) and added a strong levels adjustment to make a mask that selected as much of the background as possible (pure white) and very little of any of the tree trunks (black). Applying this mask to a burn/dodge layer I can bring up the exposure of areas of the water I want to soften and brighten while adding a little extra contrast against the trees since they will not be effected as much by anything painted onto the layer.


Wrap Up
I have made many trips to Broken Bow Oklahoma, it is one of the most scenic areas within a reasonable drive of Dallas where I can get away for a weekend and still spend enough time on location to make the travel time worth it. It does pain me as a born Texan to know this beautiful place is within the state of Oklahoma, but that doesn’t keep me from returning time and time again. Each visit has treated me to something different and something new. Different weather, different light and very different images that came home with me each time. This extremely foggy morning was a challenge and a delight. Compare the images above taken in April to the one below taken a couple months later after all the trees had filled out with foliage and under very different weather and light.
The experience this evening in June was completely different than that still foggy morning. And so was the editing process. That is the main take away that I hope you get from reading these Show and Tell articles. That every image is different, every experience is too. Every moment has something to give, and in turn the photographer needs to give something a little different when it comes to editing so that the individual image can shine to its brightest.
If you want to learn more about the editing techniques touched on in this article, I encourage you to look at my Lightroom for Landscapes series as well as Photoshop focused articles in the Post Processing category. I also offer one-on-one tutorials online and in person to give you targeted teaching focus on improving the areas of your skills that you want to improve.
